Using Equipment & Practice Time to Your Advantage

Agility course setting philosophy

We aim to set agility courses each week that cater to a variety of skill levels, whether that's achievable with a single build, or with a few modifications. We also hope to foster your ability to have concise, effective practice sessions where you can focus on the agility skills you aim to improve. 

Agility course maps are distributed via our Facebook group, so if you haven’t already make sure to join!

At the core of our philosophy is the idea that you are welcome to reposition and adjust equipment to modify the challenge for your dog, so long as things are returned to their original location. Also, depending on your dog, it may make sense to only work on small sequences at a time, or do something entirely different than what was set. Practicing on your own is all about developing an understanding of what you and your dog need to be better, and how you can create the scenarios to achieve that. 

Not sure how to make the challenge easier?

The idea is to break down the challenge to a level that your dog is ready for, rather than just trying again and again on something they may not be getting.

It’s also super important to reward your dog immediately after they do the hard bit! Sometimes as agility handlers we want to keep going, but rewarding your dog immediately is essential to learning (i.e., markers & mechanisms of rewards - key concepts in our basic manners classes). Here are a few options, in no particular order:

1. Backchain the specific hard part. Meaning, rather than trying to do the hard part in sequence, set your dog up so that the hard bit is the first line they take, or the first criteria they perform - and reward them immediately if they get it!!

This threadle slice was hard for us with speed in sequence, so we worked on that specific skill (plus light use of barrier, see #4)

2. Place a toy to help guide your dog to the correct path. This requires that your dog has an understanding of delayed rewards - a central component to our sports prep classes.

3. Remove equipment / wings to help your dog take the right path. If your dog is having trouble avoiding an off course jump, you can remove it entirely. If your dog is having trouble wrapping a jump in the right direction, you can remove the wing that they are not supposed to wrap, or lower the bar on wing that you do want them to wrap (so that they don’t have to jump as high on the easier path). Remember to reward your dog after they get it because they are such a good dog for working through this challenge with you! 

Here we both removed the jump on the left, and placed a toy after the jump to work on this wrap. Another step could have been to remove the left wing, so it was clear this was a wrap and not a slice.

4. Use visual barriers to help direct your dog - whether to help them turn tighter, avoid an off course obstacle, etc. The visual barrier can be something like a friend, or the black fencing we store somewhere along the side of the ring. Reward your dog immediately after they get it!

Make challenges easier by having someone block the wrong option!

5. Change the angle - either of the line of your dog’s approach, or of the obstacle itself, and reward your dog for doing that amazing thing!

6. If none of that works, maybe first take a break, but then take that as a sign to take a bigger step back and practice single-obstacle independence such as single jump backsides, threadles, wraps, contact criteria, etc. (key components of our foundations and skills classes). As always, make that single obstacle practice fun and rewarding! 

Those are just a few ways to make the challenge easier, but depending on the sequence there may be other options. Try to see things from your dog’s perspective, and learn to identify what questions your dog has. Doing that will help you create the situations and identify the answers that will help you and your dog get better! And don’t forget to reward your dog😉

How you can move the obstaces

Yes, setup and take down can take a bit of time! But we’ve implemented a method to mark where obstacles should be, so you don’t have to guess or try to remember. Also, every 30 minutes of rental has a 15 minute buffer both before and after, and you can use that buffer time to set up and put things back. 

Knowing that jumps/weaves/seesaw may be moved around, we place tape below the cups on jumps, or at the beginning and ending of the weaves and seesaw - to mark to where they should be returned if they are moved. 

Black tape marking the correct location of jump wings

Black tape is used to mark obstacles per the inspirational map that was used to set the course. If modifications need to be made for the in-class course, the class locations will be marked with blue tape. So, if there is only black tape in use then when you are done please make sure the obstacles are back on the black tape, or if there is blue tape then please make sure the obstacles are back on the blue tape. 

How to adjust the obstacles
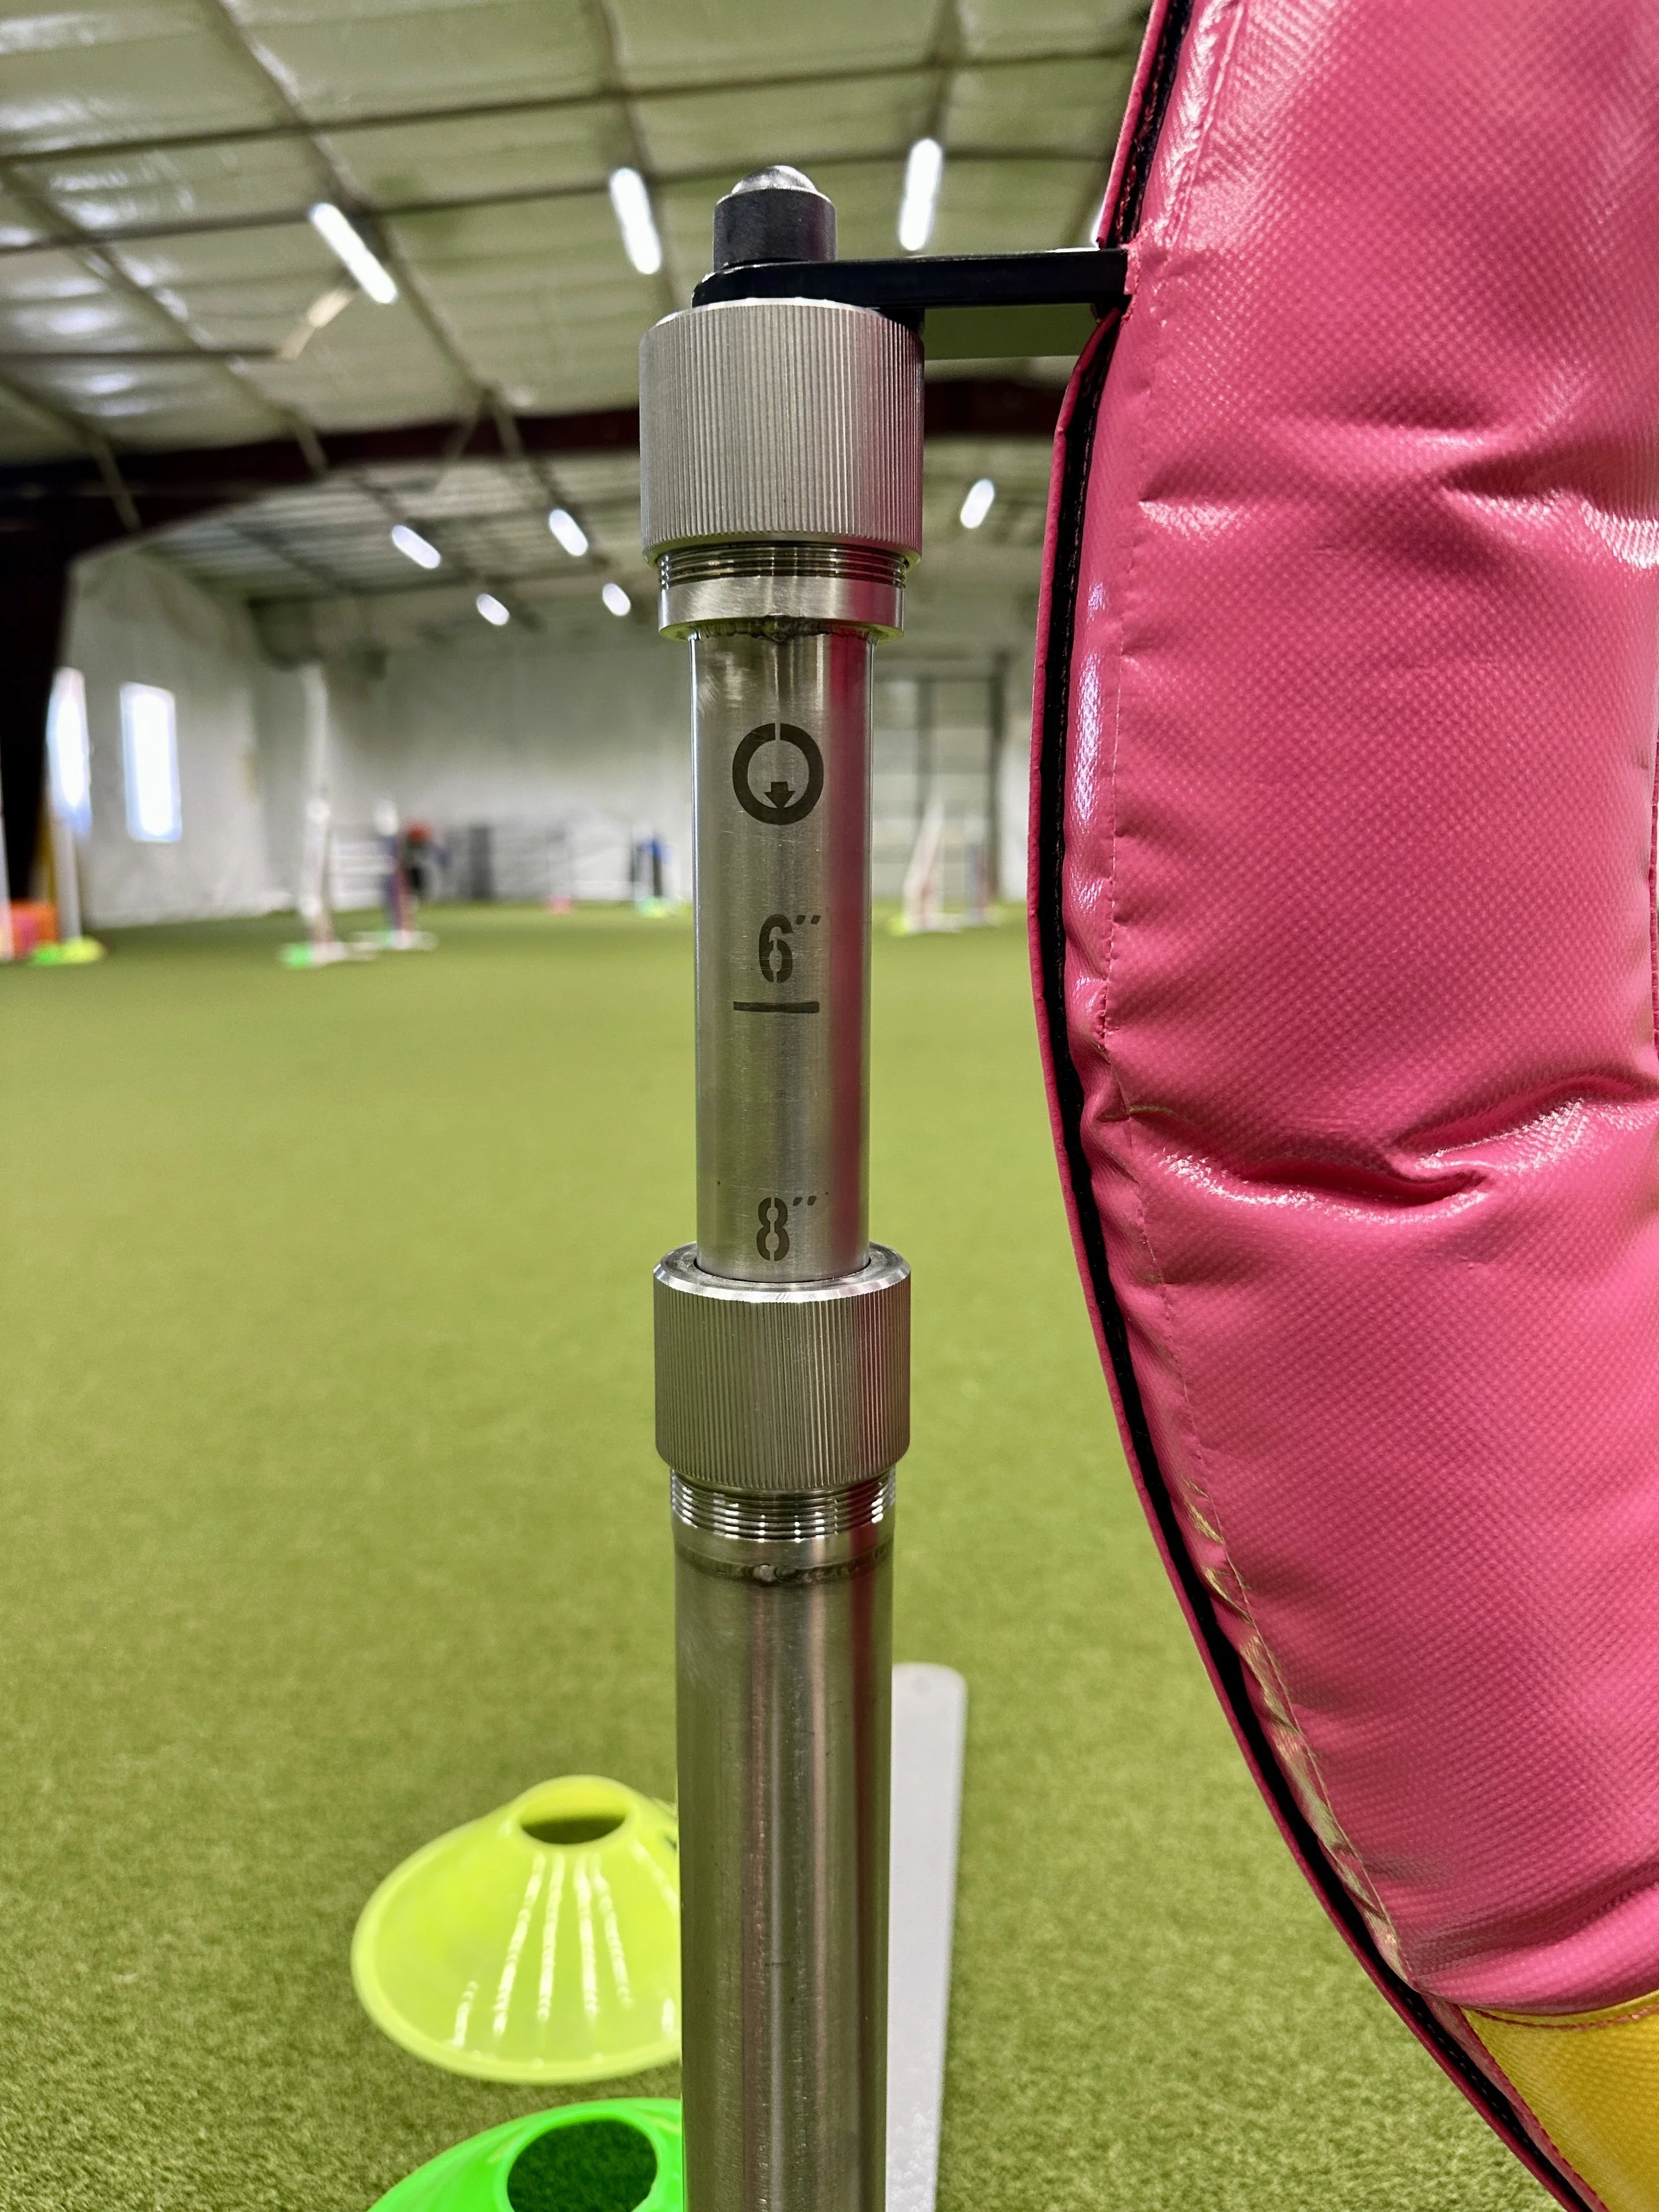
Weaves: you may have noticed we got a new set of weaves, and they’re so much better in so many ways! Huge thank you to Colorado-local Mike McCoy for his proprietary design (and the sparkly purple paint finish!). They are still channel weaves, but can be secured/loosed. To do so, lift up the individual poles and you can twist the white-ish cylindrical piece to tighten/loosen the sliders. 

The cylindrical pieces can be twisted to lock / loosen the sliders

Seesaw/teeter: the seesaw can easily be slid around to wherever you want it, just move it back when you’re done. The height can easily be adjusted by just lifting the knob on the base, so long as it’s returned to full height once you’re done. Check out this video by Galican to see how to raise and lower the seesaw.

To adjust the Galican seesaw, pull on the knob and slide the base to your desired height

A-frame: if the A-frame is out, it can be raised and lowered via the carabiners marked with tape. (This is usually a 2-3 person job). We’re planning on getting a couple more sets of carabiners to cover more heights, but for now - 5’7” = both carabiners attached. 5’3” = unhook the red carabiner, and leave the green carabiner attached. Any other heights: you may remove the green carabiner and place it at your desired height (you’ll notice its link has blue tape). You will unclip the red carabiner from the attachment point but don’t remove the red carabiner from the links. The a-frame should be returned to 5’7” when you are done. 

5'7" = both carabiners attached. 5'3" = unhook the red, leave green attached

Dog walk: as much as possible we will have the DW at least off to the side of the course, but that’s not always possible. If it’s on the course but not officially part of the map, the map will make note of that. Always be sure to practice safe dog walk entries! (Read: straight). The DW can also be lowered, but unless you are already confident in how to raise and lower it, please contact us first (and it will need to be returned to full height once you’re done). 

Tire / long jump: These often don’t make it onto the courses because they aren’t quite as versatile, but they’re off to the side and you can bring them in to practice (and you probably guessed it - just move them back off the course once you’re done). To adjust these obstacles:

Tire: There are two twistable knobs on each leg. The lower knob controls up to 14”, and the upper knob controls up to 24”. You may need to un-velcro the protective sleeve to access the lower knob. 

Long jump: in general the distance between the front of the first unit and the back of the last unit should be double your dog’s jump height (e.g. for a dog that jumps 20”, you would have 40” between the units). 2 units are used for 8 & 12”, 3 for 16”, 4 for 20”, and all 5 units for 22” & 24”

Galican long jump set for 16”

And that’s about it! If you have any questions about renting the facility, how to use equipment, or how to make the most out of your practice sessions, contact us at woof@canineathletics.co

Happy practicing! 

Next
Next

The Number One Behavior I Teach as a Dog Trainer